|
   
Tutorial 2 - Create
Texture Sets
Now we will go a bit further into the use of Ground Environment
Professional. This
is where the power and uniqueness starts to become apparent.
In the previous Tutorial we have installed our base textures
and have probably had a look at our new environment from within Flight
Simulator. Now
we are going to do something that will really release the potential of
Flight Simulator, we are going to create custom texture sets from the
base textures to match the five cloud cover situations within a standard
weather report. Each
set will be dynamically colored and created - a first for Flight Simulator!
We will open Ground Environment Professional and start where
we left off, with the base sets installed.
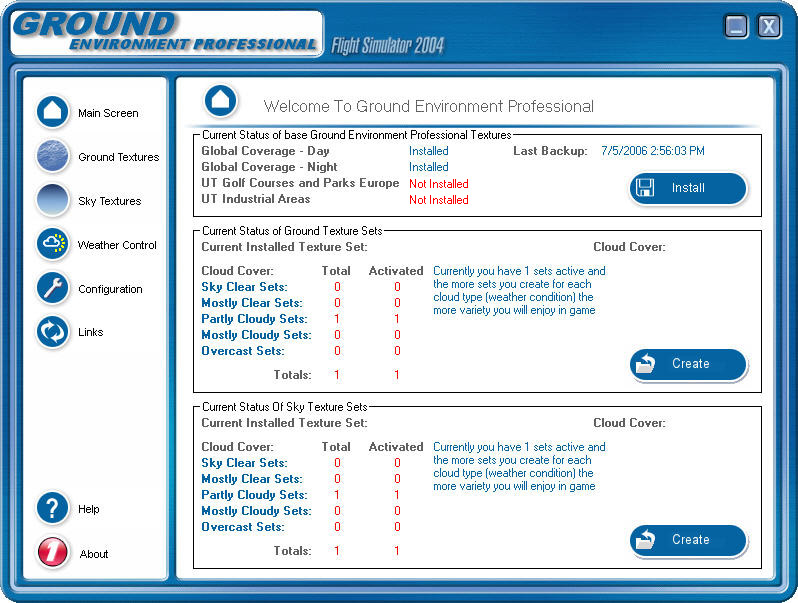
As you can see we have one ground texture set installed.
This is
the default texture set which is based on a Partly Cloudy situation. Now
we are going to create 4 more sets to cover the 5 cloud cover conditions
(be aware that on an average system Ground Texture Sets take around 20mins
to create and use approximately 100mb of disc space therefore this process
will take around 80mins and 400mb of disc space) . All
we do now is select the Create button and the following screen will appear.
As you can see here I have entered a 1 into each of the
cloud cover values that I want to create (as the Default Texture set is
Partly Cloudy we do not need a Partly Cloudy set for the purposes of this
tutorial).
Once we have entered the number of sets we wish to create
per cloud cover condition we click on the checkmark button and the creation
begins.
You can cancel this process at any time and the current
texture set being created will be rolled back. Any
completed sets already created will not be deleted.
For instance if you start to create 10 sets and find that
during the creation of the 6th set you do not have time to complete the
process just click on the cross mark button and the processing will stop.
The 6th
set will be rolled back but the completed 5 previous sets will remain
intact.
Once this is completed you will see that the values have
changed in the 'Current Status Of Ground Texture Sets' section of the
screen.

You will now see you have 5 Ground Texture Sets created
(1 for each cloud cover condition). These
items are still in red because we believe that you should have a minimum
of 2 sets of each cloud cover condition
created and ready to install to enable a good variation of looks. There
are still sufficient sets here for a good base and you can add more when
you have sufficient time. The
development team found that creating Ground Texture Sets overnight was
best way to quickly build up your collection of sets.
Now we move onto the Sky. The
Sky textures can have a dramatic effect on the environment and we are
excited that we were able to enable customization of these
textures. The
sky textures play a large part in how the environment looks and are responsible
for subtle shading on the Ground, Aircraft, Clouds and the Horizon.
To create Sky Texture Sets we go through a similar process
to the creation of the Ground Texture Sets, but, as you are only coloring
around 30 textures which are 32 x 32 pixels compared with over 2000 ground
textures which are 256 x 256 pixels, the process will take seconds rather
than minutes. This
gives you the opportunity to create a large amount of looks in a short
period of time.
First select the Create button on the 'Current Status Of
Sky Texture Sets' section and you will be presented with the following
screen.

There are subtle differences to this screen as we have more
than one set of base Sky Textures to work with. At
this stage we are going to create 10 of each cloud cover type for each
base texture type. Plus we are going to create 10 overcast texture sets
as they are a unique base set and only available for the creation of Overcast
conditions. Although it
may seem a lot, it will take less than a minute to complete and give
us a good variation of looks as a base. This will give us 170 unique sets
of Sky textures colored and customized by you in under 1 minute - a first
for Flight Simulator!
To start the process just click the checkmark button.
Once this is completed you will see the values updated on
the main screen.

As you can see in the picture above, all the Sky texture set values are
now in blue which means we believe you have the sufficient minimum to
enable a wide variation of looks within Flight Simulator.
We now have a base in which to really begin to see what
we can achieve with regard to the look of the Flight Simulator environment.
The more
sets you create the more variation you will get. Just like the real world,
the look of the environment will change each time you install a set of
textures from Ground Environment Professional.
In tutorial 3 we are going to look at various ways of installing
textures into Flight Simulator.
|